Get Started
Company
Copyright © 2022. Logaholic Web Analytics BV
Logaholic is available as a software download that you install on your own server (the ‘Self Hosted Edition’) or as a hosted service (‘Logaholic Live’). The Self Hosted Edition installs on your own hosting space or virtual web server, in a subdirectory of your website. If you do not want to install any software on your own server, Logaholic Live is the perfect solution for you. WordPress integration is available for both Logaholic SHE and Logaholic Live
The Logaholic WordPress plugin installs a free full featured web stats solution on your blog with a single click.
Step 1. Download the latest version of our Plugin. Get Logaholic here. Do not Unzip the file.
Step 2. Go to the ‘Plugins’ tab in your WordPress Back-end.
Step 3. Click on ‘Add New’ and select ‘Upload’.
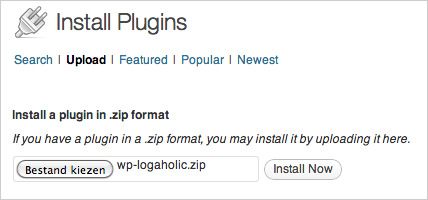
Step 4. Upload the file you just downloaded, ‘wp-logaholic.zip‘, and click Install. (see image above)
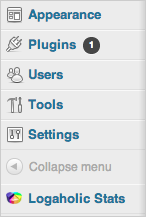
Step 5. Once Logaholic is installed, you’ll need to ‘Activate’ the plugin to be able to use our web analytics program. Logaholic should now appear as a tab in your right side-bar.
Step 6. Logaholic Self Hosted Edition is ready to use.
Compatible up to: WordPress 2.1. We are currently working on an update that is compatible with newer WordPress versions.
Logaholic Live Plugin is only available for online WordPress installations (i.e. not localhost).
The Logaholic Live WordPress Plugin enables the Logaholic Web Analytics solution on your WordPress website and/or blog. Logaholic Live is a hosted service that provides detailed statistics on your website traffic. Upon installation, it automatically adds a javascript tracker to your website and/or blog.
Step 1. Upload the `wp-logaholic-live` directory to the `/wp-content/plugins/` directory.
Or use the automatic installer in your WordPress Back-end.
Step 2. Activate the plugin through the ‘Plugins’ menu in WordPress.
Step 3. Go to the Settings menu and click Logaholic to install.
Step 4. Upon Installation you’ll be prompted to insert a valid email address, and a password.
Step 5. Logaholic will then create your Logaholic Live account.
Step 6. Logaholic Live is ready to use.